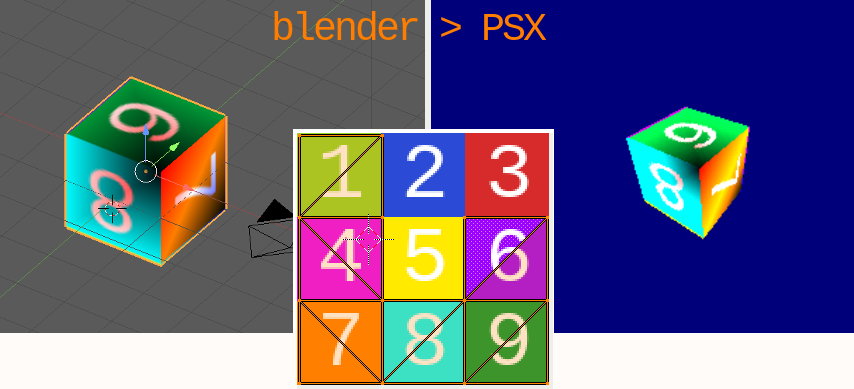
Blender 3dcam PSX engine Level exporter
This Blender plugin is to be used in conjunction with the 3dcam PSX engine.
It allows exporting a gouraud shaded, UV textured Blender scene to a format compatible with the aforementionned engine.
Documentation
Check the Wiki for in-depth informations.
Features
Be warned this is WIP !
Plugin
- Export UV textured models
- Export vertex painted models
- Export camera positions for in game use
- Export vertex animations
- Export up to 3 light sources
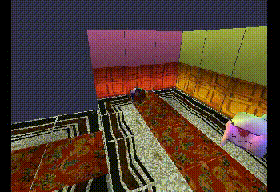
- Export pre-rendered backgrounds for in-game use (8bpp and 4bpp)
- VRam auto layout for TIMs
- Export sound/music as VAG/XA files
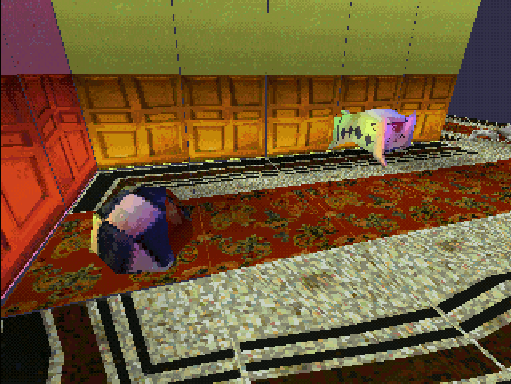
Real-time 3D / 8bpp background / 4bpp background
Planned
- Fix and improve all the things !
Install the plugin
This plugin is not compatible with Blender > 2.79.
- Download and install Blender 2.79b.
http://download.blender.org/release/Blender2.79/
- Clone this repository in the addons folder of blender 2.79 :
git clone https://github.com/ABelliqueux/blender_io_export_psx_mesh.git
- Dependencies
These utilities should be in your $PATH :
- pngquant : convert image to 4/8bpp palettized pngs
- ffmpeg : convert audio to WAV
- img2tim : convert image to psx TIM - Win32 pre-built bin : https://github.com/Lameguy64/img2tim#download
- wav2vag : convert WAV to psx VAG - Win32 pre-built bin : http://psx.arthus.net/tools/wav2vag-win32.zip
- psxavenc : convert WAV to psx XA - Win32 pre-built bin : http://psx.arthus.net/sdk/candyk-psx-tools.zip
- xainterleave : interleave psx XA files - Win32 pre-built bin : http://psx.arthus.net/sdk/candyk-psx-tools.zip
Linux users, these utilities are trivial to build using gcc -o output source.c.
Only psxavenc and img2tim are a bit more involved as you should install the ffmpeg and freeimage dev packages from your distro before compiling.
On Debian,
sudo apt install libavformat-dev libfreeimage-dev
should set you up. Arch users, dev files are already on your system as long as the package is installed.
sudo pacman -S ffmpeg freeimage
Building img2tim :
# In img2tim's sources directory :
gcc -o img2tim main.cpp
Building psxavenc and xainterleave :
# Use the Makefile that's in candyk-psx's sources directory :
make tools
# bins will appear in 'candyk-psx/bin'
For users with Imagemagick installed, there is an option when exporting to use that instead of pngquant.
- Enable the add-on in Blender by going to user preferences, Add-ons tab, and enable
Import-Export: PSX TMesh exporter.
On Linux : ~/.config/blender/2.79/scripts/addons
On macOS : ./Blender.app/Contents/Resources/2.79/addons
On Windows : %USERPROFILE%\AppData\Roaming\Blender Foundation\Blender\2.93\
Install the 3D engine
Head over to the 3dcam repo and follow the setup instructions there.
Export your scene !
Open a working copy of your scene, add the needed flags and export your level in the 3dcam-headers folder.
Following those steps, you should now see your scene running on PSX !
Custom properties helper add-on
3dcam-helper
A small blender addon is provided that facilitates setting and copying flags between several objects in your scene.
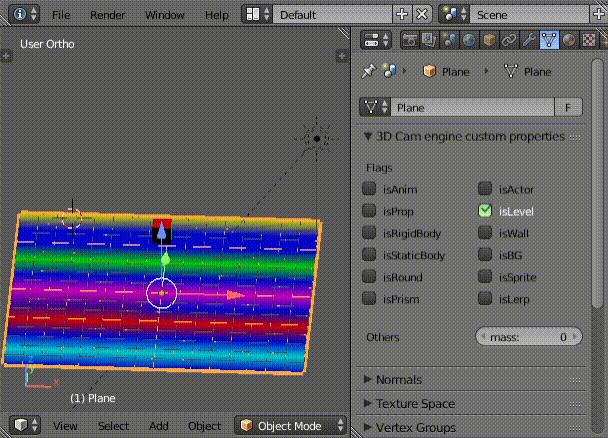
See the documentation for usage instruction.
The script only does the job of creating/updating the object's custom properties, so it is not mandatory to use it.
Credits
Based on the code provided by TheDukeOfZill, 04-2014, on http://www.psxdev.net/forum/viewtopic.php?f=64&t=537#p4088
pngquant : https://github.com/kornelski/pngquant
img2tim : https://github.com/Lameguy64/img2tim
Freeimage : https://freeimage.sourceforge.io/