8.1 KiB
Alpine Install: from a USB to any computer without internet and only alpine boot
Overall description: Alpine Installation from a official iso, dumpet to a usb source device media, and installed to a bare metal computer no matter if include UEFI and will be the only OS installed to boot, the networking configuration will happened AFTER you install the operating system, so you can configure it with more detail.
Means you will install Alpine as the only OS in a PC computer from USB BUT OFFLINE media.
And.. after boot up the new operating system, you will put apk files to setup wifi
Warning This method only works for most modern pc vbeyond 2016 and recents.
Requirements
- A usb stick to write the ISO source media file downloaded
- In the new machine we need support for booting from USB devices
- In the new machine we need at least 512Mb of RAM, 2Gb prefered.
- IF you dont have internet but still have network disconected or no cable
Downloading the source medium to install
In this case, your PC wil have UEFI or must be beyond 2016's you will need 64-bit iso EXTENDED, if you dont use extended version your will need internet networking, the download URL will be:
http://dl-cdn.alpinelinux.org/alpine/v3.17/releases/x86_64/alpine-extended-3.17.3-x86_64.iso
Warning you must use extended ISO file, if not you will be forced to have internet.
How to download usin Graphical browser: point the web browser to that url and the download of the iso file will start. A file with .iso extension type, will be downloaded commonly into the Download directory.
How to download usin Command line method: in unix-like terminal (MAC/Linux) execute:
cd $HOME;wget -c -t8 --no-check-certificate http://dl-cdn.alpinelinux.org/alpine/v3.17/releases/x86_64/alpine-standard-3.17.3-x86_64.iso,
and unless the case of GUI, your .iso file wil be direclty in your home directory.
Warning The 3.17.0 release ISO has a bug, does not included the need pacakges for offline install.
Writing the source medium to your USB
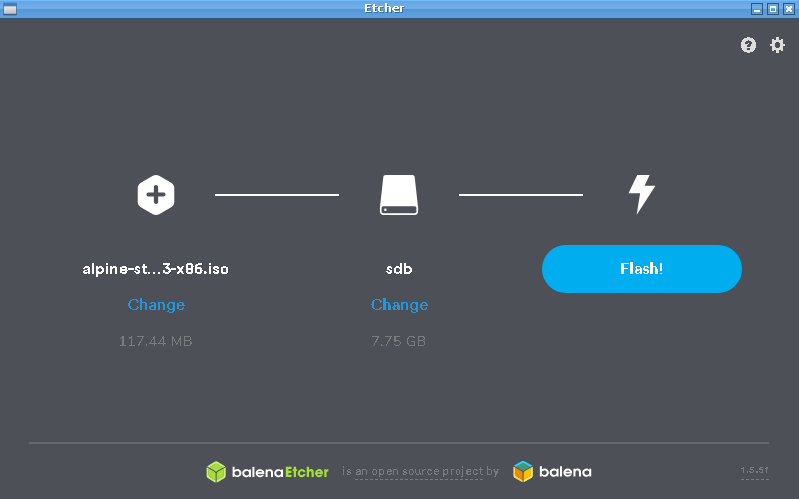
Using balena-etcher-electron to flash the USB drive from any system, its easy, simple and available for all OSs.
* Warning this guide assume only one hard drive as
/dev/sdaand only one USB as/dev/sdb
- download the
program balena-etcher-electron(there are portable versions) - Run the program
balena-etcher-electronas root in the graphical session - Click "select image" icon, open the downloaded image file
- Plug the USB drive into the computer, it will automatically show as
sdb - After it balena-etcher-electronshows the USB as “sdb”, clickflash
- Wait a while and when finished, close the program
- Take out the USB and place it on the installation target computer in a port
Note this method only works on recent MacOs 10.12+ or recent Linux 4.9+ installations
You can also made it manually, open your terminal program, move to the place
directory where ISO downloaded are placed and cp to the USB device:
umount /dev/sdb; cp alpine-standard-3.17.0-x86_64.iso /dev/sdb
Booting the Alpine USB media
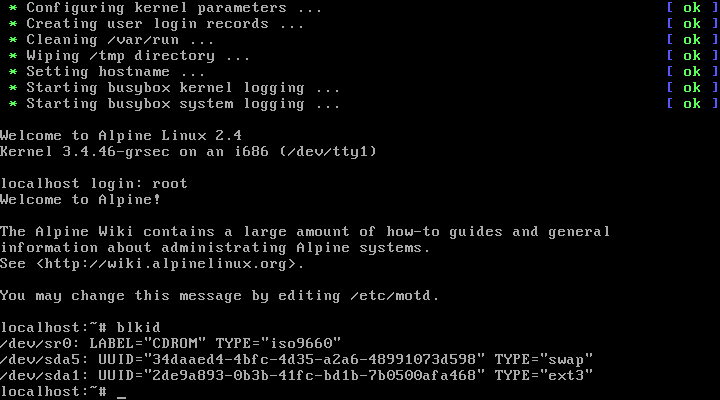
When the machine start, you must be sure to choose the right booting drive (commonly named USB boot drive or USB hard disk), so the disc/iso will boot and after a while a command line shell will show you:
Note When starting Alpine it will ask for the login, just typing root and pressing enter allows you to start:
Warning Tip: If your system is not configured to boot from a USB drive, it must be configured in the BIOS/UEFI, ask/search to your vendor or technical support, Toshiba computers need to hit F1 to choose boot medium, DELL must hit F11 to choose medium for example, and so and so
Installing after boot up
Warning if you do not download the extended ISO it may require internet.!!!
runing the setup script
After entering the root environment and gets the console prompt installation media, you must perform these commands, that will:
- prepare disk sizes, boot partiton to 500 megs
- perpare swap sices, swap partition to 2 Gigs
- and run setup script to configure and process instalation:
export BOOT_SIZE=500

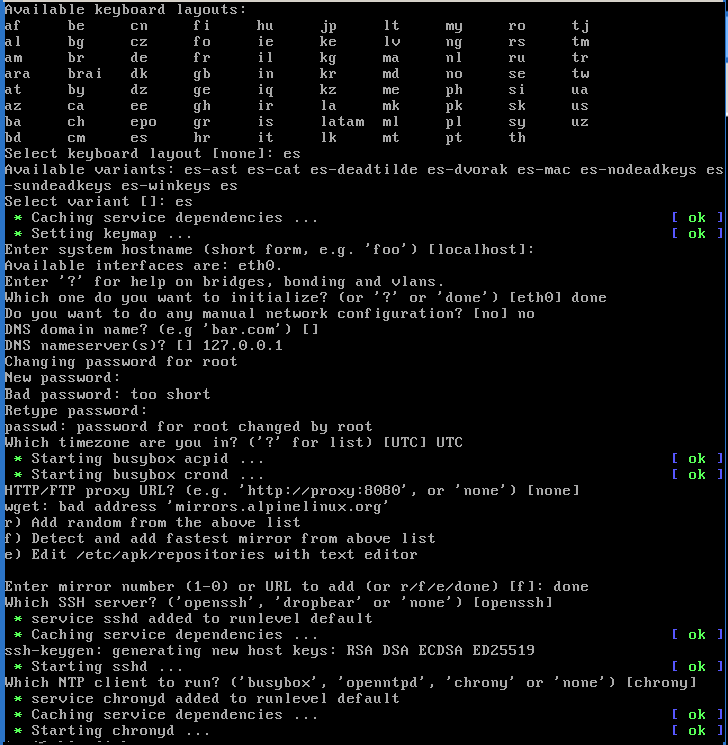
setup-alpine
This will start some questions, these are in the following order:
- keyboard and variant, example for Latin is esand afteres-winkeys
- hostname: just hit enter, it's the name of the computer.
- Network options: write
donecos you dont have internet and has no sense - DNS Options: dont write anything, leave blank and write
nonefor the domain - Time zone options: Just use the suggested defaults, just hit enter.
- Proxy Options: Use
nonein this case, please - NTP Options: Use
chronythe packet already in the middle. - Enter mirror number: here due lack of network internet just write "done"
- SSH Options: Use
opensshthe package that already comes in the middle. - Alow root login: write
yescos we will changed later. - Enter the ssh URL: just write
noneor just hit enter - Disk Options: Use
sdaas the entire hard drive present will be used. - Mode: Select
systo install the system on disk.
After answering sys to the questions about the drive, and since there will only
be one drive, answering sda on which drive to use, this will create and leave
your hard drive as follows:
/dev/sda1as BOOT in 500Mb in/boot/dev/sda2as SWAP in 4Gb/dev/sda3as ROOT in 200Gb in/(approximately or rest of space available)
In a few minutes everything will be ready to use ofering a console when boot new system.
Finishing the installation
After all of the scripts in the setup end, a "reboot" will be offered, just type "reboot" and press enter, remove the boot media and newly installed system will be booted.
You cannot see a graphical window system? take it easy and get calmed down.. in Alpine all are made by the right way.. so if user need a desktop.. user can install a desktop
The wifi setup after install
Please follo the guiude alpine-tutorial-wifi-routering.md, you will need to download the needed packages manually from another device and then but it on the installed Alpine computer using USBstorage external device.
How to use this guide
This guide is for install process, many parts will need you understand minimal knowledge of linux.
This guide assumed you have a serial port allowed in the targeted computer, also its important you shuold understand the way of the configuration in this guide.
Warning Some Linux or/and Mac terminals have security cut/paste locks, so if you paste, the first line will be preceded by garbage, check always the first char of your paste.
Licensing clarifications
CC BY-NC-SA: the project allows reusers to distribute, remix, adapt, and build upon the material in any medium or format for noncommercial purposes only, and only so long as attribution is given to the creators involved. If you remix, adapt, or build upon the material, you must license the modified material under identical terms, includes the following elements:
- BY Credit must be given to the creator of each content respectivelly, starting at the first contributor.
- NC Only noncommercial uses of the work are permitted, with exceptions if you fill an issue here!
- SA Adaptations must be shared under the same terms, you must obey this terms and do not change it.
https://codeberg.org/alpine/alpine-wiki/src/branch/main#license


